博客

  • 使用nebula facet插件扩展项目

    对于一般的Gradle项目而言,主要的代码有两块,一块是main,一块是test。

    但是很多时候我们需要的不只是main和test,比如一个小项目,如何随项目一起附带一个简单的demo。

    放在main里面自然不合适,放在test中感觉也很普通的单元测试会混淆。这种时候就希望能够在main和test之外再扩展一个demo出来。

    Netflix的Gradle插件就可以完成这个工作

    apply plugin: 'nebula.facet'

    然后在配置中添加

    facets {
        demo
    }

    这样我们就拥有了一个名为demo的块,目录为src/demo。然后编译任务名称为 demoClasses。

    这样我们就可以很轻松的新建一个跑demo的任务

    task demo(dependsOn: demoClasses, type: JavaExec) {
        main = "net.mwplay.cocostudio.ui.Runner"
        classpath = sourceSets.demo.runtimeClasspath
        standardInput = System.in
        workingDir = "$projectDir/src/demo/resources"
        ignoreExitValue = true
    }
  • Travis CI使用Ubuntu trusty

    之前Travis CI支持的Ubuntu 12.X,一般使用还好,但是对于有UI的,需要xvfb的有时候会有点问题。

    现在直接支持Ubuntu Trusty了。使用方法

    sudo: required
    dist: trusty

    其他照旧。

  • 使用Travis CI的Env特性测试版本兼容性

    Libgdx一直没有官方的UI编辑器,而cocostudio作为编辑器的能力让人羡慕。

    有一个简单的办法就是使用cocostudio,导出项目,然后构建一个LIbgdx的runtime解析器,比如这个项目https://github.com/tianqiujie/cocostudio-ui-for-libgdx

    Libgdx有很多版本,如果能够长久保持一定版本的支持(比如最新版为1.9.2,可以考虑支持1.7.0及以上)。

    Travis提供了Env功能,可以配置多个环境变量,比如这里以版本为变量

    language: java
    
    jdk:
      - oraclejdk7
    
    env:
     - GDX_VERSION=1.9.2
     - GDX_VERSION=1.9.1
     - GDX_VERSION=1.9.0
     - GDX_VERSION=1.8.0
     - GDX_VERSION=1.7.0
    
    before_install:
     - chmod +x gradlew
    

    然后在Gradle配置中修改一下,改成先判断环境变量,如果没有就是用指定版本1.9.2,这样开发人员在本地不需要其他配置也可以让项目正常运行。

    ext {
        gdxVersion = System.env.GDX_VERSION != null ? System.env.GDX_VERSION : '1.9.2';
    }
    

    然后在Travis CI中的执行效果如下

    travis-ci-env

  • 快速将csv转为Spark Dataframe

    CSV,或者叫逗号分隔值,是以逗号为分隔符,简单而使用。虽然并没有真正的标准,但是RFC 4180中有一个大致的表述。

    很多时候我们拿到的原始数据都是csv的,而快速将其转为Spark的Dataframe做进一步分析就是一个经常遇到的问题。

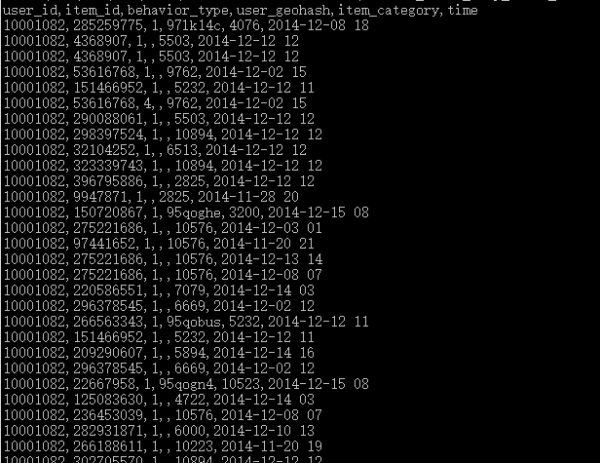
    先来一个简单的例子,这里以手淘的数据为例子

    spark-dataframe-1

    共有六列。

    先建立一个简单对象Record,然后直接用Spark的createDataFrame方法

    JavaRDD<Record> list = sc.textFile(userFile).map(new Function<String, Record>() {
    	@Override
    	public Record call(String v1) throws Exception {
    		String[] split = v1.split(",");
    		return new Record(split[0], split[1], split[2], split[3], split[4], split[5]);
    	}
    });
    DataFrame dataFrame = sqlContext.createDataFrame(list, Record.class);

    这样的操作有一些不方便的地方,第一个是需要创建一个额外的类,另外一个是缺乏数据类型自动推断。

    databricks在Spark方面有相当的积累,也有一些对应的包,其中就包括了csv包。

    compile 'com.databricks:spark-csv_2.11:1.4.0'

    使用时直接指定format

    DataFrame record = sqlContext.read().format("com.databricks.spark.csv").option("header", "true")
    				.option("inferSchema", "true").load(userFile);

    这包含了自动的header和类型推导。

  • 创建展示项目基本信息的Endpoint

    Spring Boot中的Endpoint可以提供很多便利信息,但是有时候自带的信息不能满足需要,就需要我们自己创建一个Endpoint。

    对于一个项目而言我们希望能够了解到一些基本的信息,比如项目的构建环境,git仓库信息,CI的build number等等。

    Netflix的nebula项目提供了很多gradle的插件,而搜集信息我们可以使用gradle-info-plugin。

    buildscript {
        repositories { jcenter() }
        dependencies { classpath 'com.netflix.nebula:gradle-info-plugin:3.+' }
    }
    
    apply plugin: 'nebula.info'

    这样在gradle构建项目的时候就会自动搜集信息,并存储在Properties文件中。这样就可以自定义一个Endpoint来展示这些信息。

    import com.google.common.collect.Maps;
    
    import org.slf4j.Logger;
    import org.slf4j.LoggerFactory;
    
    import org.springframework.boot.actuate.endpoint.AbstractEndpoint;
    
    import org.springframework.stereotype.Component;
    
    import java.io.IOException;
    import java.io.InputStream;
    
    import java.util.HashMap;
    import java.util.Map;
    import java.util.Properties;
    
    
    @Component
    public class VersionEndpoint extends AbstractEndpoint<Map<String, Object>> {
        private Logger logger = LoggerFactory.getLogger(this.getClass());
    
        public VersionEndpoint() {
            super("version", false);
        }
    
        @Override
        public Map<String, Object> invoke() {
            HashMap<String, Object> maps = Maps.newHashMap();
            InputStream inputStream = this.getClass().getClassLoader()
                                          .getResourceAsStream("META-INF/{项目名字}.properties");
    
            try {
                Properties properties = new Properties();
                properties.load(inputStream);
    
                for (Map.Entry<Object, Object> entry : properties.entrySet()) {
                    maps.put(String.valueOf(entry.getKey()), entry.getValue());
                }
            } catch (IOException e) {
                logger.error("Error when process file", e);
            }
    
            return maps;
        }
    }
    

    这样我们访问/version时就可以看到类似这样的输出

    version-output

    参考资料

    https://github.com/nebula-plugins/gradle-info-plugin

  • Spring Framework 4.3 注入机制的改进

    Spring Framework 4.3有两个有趣的改动,第一个是单一构造函数的自动注入,第二个就是注入依赖条件的配置。

    来看看之前版本的代码

    @Service
    public class FooService {
    
        private final FooRepository repository;
    
        @Autowired
        public FooService(FooRepository repository) {
            this.repository = repository
        }
    }

    @Autowired注解是一个很关键的东西,如果你忘记了,那么运行就会出现null错误。在新版本中,你无需这个注解了,Spring会自动处理这种情况。当然,这个功能同样对@Configuration等有效。

    新的ObjectProvider可以提供两个特别的方法getIfAvailable和getIfUnique。比如这种

    @Service
    public class FooService {
    
        private final FooRepository repository;
    
        public FooService(ObjectProvider<FooRepository> repositoryProvider) {
            this.repository = repositoryProvider.getIfUnique();
        }
    }

    具体的实现可以参考DefaultListableBeanFactory,比如

    public Object getIfUnique() throws BeansException
    {
    	DependencyDescriptor descriptorToUse = new DependencyDescriptor( descriptor )
    	{
    		@Override
    		public boolean isRequired()
    		{
    			return(false);
    		}
    
    
    		@Override
    		public Object resolveNotUnique( Class<?> type, Map<String, Object> matchingBeans )
    		{
    			return(null);
    		}
    	};
    	if ( this.optional )
    	{
    		return(new OptionalDependencyFactory().createOptionalDependency( descriptorToUse, this.beanName ) );
    	}else  {
    		return(doResolveDependency( descriptorToUse, this.beanName, null, null ) );
    	}
    }


  • Spring Security从表单验证到token验证

    对于任何需要认证的系统,Spring Security无疑是一个很好的选择。

    无论是从认证本身,还是权限控制,Spring Security都有极好的支持。

    Form登录是一种极为常见的方式,用户输入用户名和密码,post登录信息,认证之后登录信息保存在session之中。

    但是随着架构演进,前后端逐渐分离,之前的大部分逻辑都变成了API供前端调用,而Form登录逐渐成为累赘,调试上的困难。这个时候就可以考虑换为token模式,进而将后端API stateless化。

    Token的生成和解析

    第一步是选择token的生成和解析,我们来个简单的,token中只包含加密后的用户名,具体生成才是JWT的HS512加密。

    先配置一个登录成功后的响应AuthSuccessHandler

    public class AuthSuccessHandler implements AuthenticationSuccessHandler {
        public static final String SECRET_KEY = "0Qx*@S7q";
    
        @Override
        public void onAuthenticationSuccess(HttpServletRequest request, HttpServletResponse response,
                                            Authentication authentication) throws IOException, ServletException {
            response.setStatus(HttpStatus.OK.value());
            JsonNodeFactory factory = JsonNodeFactory.instance;
            ObjectNode objectNode = factory.objectNode();
            objectNode.set("status", factory.textNode("success"));
            objectNode.set("token", factory.textNode(createToken(authentication)));
            PrintWriter out = response.getWriter();
            out.write(objectNode.toString());
            out.close();
        }
    
        private String createToken(Authentication authentication) {
            return Jwts.builder()
                    .setSubject(authentication.getName())
                    .signWith(SignatureAlgorithm.HS512, SECRET_KEY)
                    .compact();
        }
    }

    配置中添加一句

    and().formLogin().successHandler(new AuthSuccessHandler())

    这样登录成功后会返回类似这样的json

    {
        "status": "success",
        "token": "eyJhbGciOiJIUzUxMiJ9.eyJzdWIiOiJ4aWFuIn0.O5xEDP5JCMcrQzpRaswsrhWfZ1Wlw7r8-94KU14G6wN_nSKH0YZZprKaoiuiNIRXWbmkX68KFx2fts1DPbPnOw"
    }

    Token认证

    现在我们有了token,任何消费API的请求都需要在header中包含这个token,然后再根据这个token给予用户的请求完成认证,Spring Security的Pre-Auth就是合适的方案。

    当我们获取token以后直接解码获得用户名,并给予当前访问认证。

    final String token = request.getHeader(AUTH_HEADER_NAME);
            if (!StringUtils.isEmpty(token)) {
                String username = Jwts.parser()
                        .setSigningKey(AuthSuccessHandler.SECRET_KEY)
                        .parseClaimsJws(token)
                        .getBody()
                        .getSubject();
                if (username!= null) {
                    logger.info(String.format("User login in with user name: %s", username));
                    return new UsernamePasswordAuthenticationToken(username, "", Lists.<GrantedAuthority>newArrayList());
                }
            }
            return null;

    这个一个Filter,它的位置位于UsernamePasswordAuthenticationFilter之前,在配置中直接配置

    .addFilterBefore(new TokenAuthenticationFilter(), UsernamePasswordAuthenticationFilter.class);

    这样就完成了token的认证,只要请求包含有效的token,那么就能访问授权后的资源。

    其他

    这只是一个简单的例子,token的生成方式非常脆弱,也没有过期超时等等的验证。Spring Security还有oauth模块,可以使用其中的tokenStore等等去完善。

  • Spring Boot starter

    Spring Boot推出后取得了巨大的成功,方便快速上手,还附带了很多product-ready特性。对微服务架构也很友好。

    随着Spring Boot一起推出的还有Spring Boot众多的starter。当你喜欢使用某些组件时,试试starter,只需要使用构建工具引用一个依赖,你就可以快速获得它。

    了解starter之后你也可以自己实现自己的starter,以便其他同事快速使用公司内部特有的组件。

    spring.factories

    每个starter都有一个spring.factories文件,位于META-INF目录下。

    # Auto Configure
    org.springframework.boot.autoconfigure.EnableAutoConfiguration=\
    org.springframework.boot.autoconfigure.admin.SpringApplicationAdminJmxAutoConfiguration,\
    org.springframework.boot.autoconfigure.aop.AopAutoConfiguration,\
    org.springframework.boot.autoconfigure.amqp.RabbitAutoConfiguration,\
    org.springframework.boot.autoconfigure.MessageSourceAutoConfiguration,\

    随便开一个文件来看

    @Configuration
    @ConditionalOnClass({ RabbitTemplate.class, Channel.class })
    @EnableConfigurationProperties(RabbitProperties.class)
    @Import(RabbitAnnotationDrivenConfiguration.class)
    public class RabbitAutoConfiguration {
    
    	@Bean
    	@ConditionalOnProperty(prefix = "spring.rabbitmq", name = "dynamic", matchIfMissing = true)
    	@ConditionalOnMissingBean(AmqpAdmin.class)
    	public AmqpAdmin amqpAdmin(ConnectionFactory connectionFactory) {
    		return new RabbitAdmin(connectionFactory);
    	}

    可以看到很多@ConditionalOnXXX的注解,这就是关键的地方。

    条件注解

    在引入starter后可能会提供一些暴露给上下文的bean,但是有时候又是不需要的,比如用户自己提供了对应的bean,或者用户通过配置关闭了部分功能。

    主要的条件有这几种

    • OnBeanCondition
    • OnClassCondition
    • OnExpressionCondition
    • OnJavaCondition
    • OnJndiCondition
    • OnPropertyCondition
    • OnResourceCondition
    • OnWebApplicationCondition
    • OnMissingBean
    • OnProperty

    当对应条件满足时,响应的代码才会执行。

    比如starter中并没有引入对应的具体实现,那么这种情况下就不应该实例化相应的配置和实例。

    比如CassandraDataAutoConfiguration,在没有Cassandra对应实现情况下就应该直接忽略

    @ConditionalOnClass({ Cluster.class, CassandraAdminOperations.class })

    如果用户自己配置了CassandraMappingContext,那么starter中就不应该再提供任何MappingContext配置

    @Bean
    	@ConditionalOnMissingBean
    	public CassandraMappingContext cassandraMapping() {
    		return new BasicCassandraMappingContext();
    	}

    ConditionalOnExpression我一直觉得是一个很有用处的配置,使用SpEL基本上能够实现所有情况判断,但是我并没有看到任何一个用这个的例子。

    活用这些配置,可以轻易创造出很多灵活的starter。

  • Spring Boot输出日志到文件

    Spring Boot对于日志的支持是比较到位的,默认logback实现,输出到console。

    如果你的console支持ANSI,那么还可以选择彩色输出。

    很多时候可能并不只是希望日志能够输出到console,还希望能够保存到目录,甚至后期配合splunk等等做分析统计。

    Spring Boot会检测logging.file和logging.path是否存在,如果存在的话就会输出到文件中。这个配置可以在application.properties中设置。

    如果应用打包已经完成了,可以直接在命令行配置

    java -jar app.jar -Dlogging.path=/alidata/log


  • Spring Boot的Banner

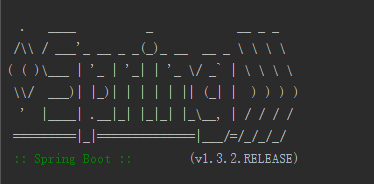
    Spring Boot应用在启动的时候会输出一个Banner,同时还会输出使用的Spring Boot的版本。

    默认的Banner如下

    spring-default-banner

    如果你需要自己替换的话可以放置一个banner.txt文件,这样Spring Boot就会使用自定义的banner,而不是默认的banner。

    Spring Banner的选择逻辑

    Banner的优先级和具体逻辑在SpringApplication中。

    	private Banner selectBanner(Environment environment) {
    		String location = environment.getProperty(BANNER_LOCATION_PROPERTY,
    				BANNER_LOCATION_PROPERTY_VALUE);
    		ResourceLoader resourceLoader = this.resourceLoader != null ? this.resourceLoader
    				: new DefaultResourceLoader(getClassLoader());
    		Resource resource = resourceLoader.getResource(location);
    		if (resource.exists()) {
    			return new ResourceBanner(resource);
    		}
    		if (this.banner != null) {
    			return this.banner;
    		}
    		return DEFAULT_BANNER;
    	}

    尝试去加载自定义的banner,如果没有那么返回默认的。

    默认的banner是SpringBootBanner,定义为

    private static final String[] BANNER = { "",
    			"  .   ____          _            __ _ _",
    			" /\\\\ / ___'_ __ _ _(_)_ __  __ _ \\ \\ \\ \\",
    			"( ( )\\___ | '_ | '_| | '_ \\/ _` | \\ \\ \\ \\",
    			" \\\\/  ___)| |_)| | | | | || (_| |  ) ) ) )",
    			"  '  |____| .__|_| |_|_| |_\\__, | / / / /",
    			" =========|_|==============|___/=/_/_/_/" };

    当然,你也可以直接关闭banner的输出,在createAndRefreshContext方法中

    if (this.bannerMode != Banner.Mode.OFF) {
    			printBanner(environment);
    		}
    

    当然这些都可以通过配置文件控制的。

    Remote模式的banner

    Spring Boot通过集成crash提供了Remote Shell,这样用户可以通过ssh直接登录。

    在Remote模式下也是有banner的,但是如果你配置了banner.txt文件,你会发现Remote模式下的banner依然是默认的Spring banner。

    这是因为login.groovy中并没有实现banner的选择逻辑,而是直接硬编码了一个banner

    welcome = { ->
    	if (!crash.context.attributes['spring.environment'].getProperty("spring.main.show_banner", Boolean.class, Boolean.TRUE)) {
    		return ""
    	}
    
    	// Resolve hostname
    	def hostName;
    	try {
    		hostName = java.net.InetAddress.getLocalHost().getHostName();
    	}
    	catch (java.net.UnknownHostException ignore) {
    		hostName = "localhost";
    	}
    
    	// Get Spring Boot version from context
    	def version = crash.context.attributes.get("spring.boot.version")
    
    	return """\
      .   ____          _            __ _ _
     /\\\\ / ___'_ __ _ _(_)_ __  __ _ \\ \\ \\ \\
    ( ( )\\___ | '_ | '_| | '_ \\/ _` | \\ \\ \\ \\
     \\\\/  ___)| |_)| | | | | || (_| |  ) ) ) )
      '  |____| .__|_| |_|_| |_\\__, | / / / /
     =========|_|==============|___/=/_/_/_/
     :: Spring Boot ::  (v$version) on $hostName
    """;
    }
    
    prompt = { ->
    	return "> ";
    }
    

    还有一个可能的配置文件叫remote-banner.txt,但是它是应用于devtools的remote模式,并不是ssh登录的那个Remote模式。

    所以目前而言,Remote模式是没有办法换Banner的,最好直接关闭。