本文版权归作者所有,欢迎转载,但未经作者同意必须保留此段声明,且在文章页面明显位置给出原文连接,否则保留追究法律责任的权利。
转载自夜明的孤行灯
本文链接地址: https://www.huangyunkun.com/2015/09/06/libgdx-unit-test-with-runner/
Libgdx应用由于其特殊性,测试本身还是有一定难度的。好在Libgdx自身可以跨平台,在桌面平台调试/测试自然比在设备上方便不少。
但是一个庞大的项目光看调试/测试是很难保证高可靠性的,特别是很多情况并不好测试,比如触发特定事件后的抽奖模块。
如果可以使用一定数量的单元测试来保证应用的可靠性那自然是最好的了。
分离绘制
Libgdx应用测试的一个困难在于UI层面,基于opengl绘制出的界面并没有特定的自动化工具来完成测试,最简单的办法就是分离绘制和其他模块。
你现有的Libgdx应用可能是这样的
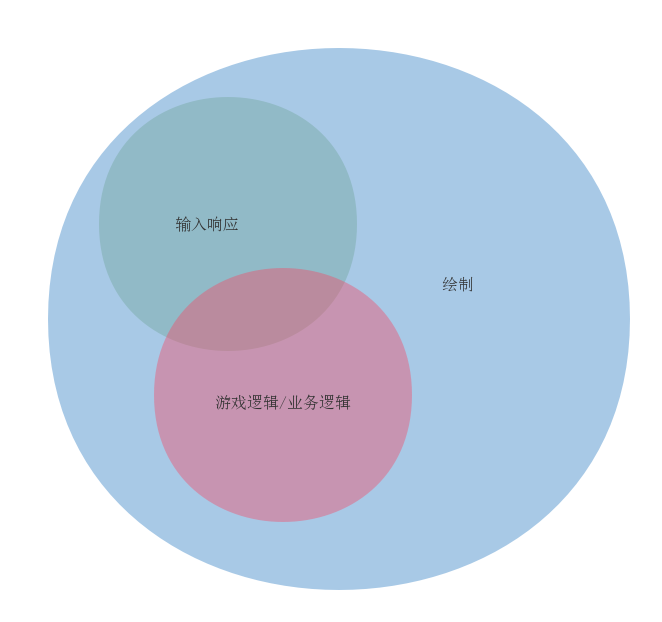
在render中放置了大量的代码,并在其中直接处理输入和其他逻辑,那么这种代码确实很难测试。
如果你的应用是这个样子的
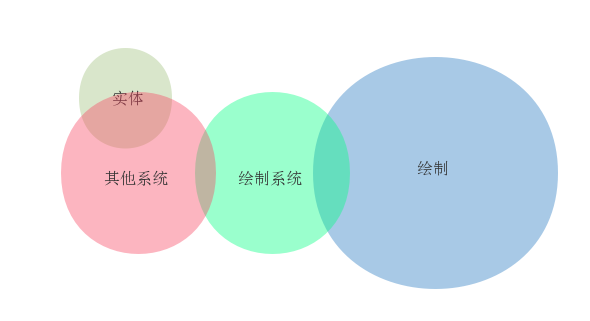
那么大部分代码都可以直接被单元测试覆盖。
Libgdx提供了ashley作为实体系统。
利用Backend测试
即使剥离了绘制,还是有大部分代码需要Libgdx环境。Libgdx环境是指除绘制以外其他模块,比如Gdx.files。
这种情况下最简单的就是使用headless backend测试。
这个backend有关gl部分是mock出来的,但是其他部分都是真实的,基本可以视为单元测试环境。
在Web开发中我们喜欢提functional测试,即控制浏览器在页面上操作,并作出断言检测。
其实利用Jglfw,我们依然可以做出类似的测试。
我自己定义了一个Junit的Runner作为测试的辅助。这样的测试会打开一个界面,然后在测试完成后关闭。
publicclass LibgdxRunner extends BlockJUnit4ClassRunner {
private Random random =new Random();
publicLibgdxRunner(Class<?> klass)throws InitializationError {
super(klass);
initApplication();
}
privatevoidinitApplication() {
try {
JglfwApplicationConfiguration cfg =new JglfwApplicationConfiguration();
cfg.preferencesLocation = String.format("tmp/%d/.prefs/", random.nextLong());
cfg.title ="Libgdx Runner";
cfg.width =1;
cfg.height =1;
new JglfwApplication(new TestApplicationListener(), cfg);
ConditionWaiter.wait(() -> Gdx.files !=null,"Jglfw init failed.",10);
}catch (Exception ex) {
thrownew LibgdxInitException(ex);
}
}
@Override
protectedvoidrunChild(FrameworkMethod method, RunNotifier notifier) {
Description description = describeChild(method);
if (description.getAnnotation(NeedGL.class) !=null) {
final AtomicBoolean running =new AtomicBoolean(true);
Gdx.app.postRunnable(() -> {
if (isIgnored(method)) {
notifier.fireTestIgnored(description);
}else {
runLeaf(methodBlock(method), description, notifier);
}
running.set(false);
});
ConditionWaiter.wait(() -> !running.get(), description,30);
}else {
runLeaf(methodBlock(method), description, notifier);
}
}
privateclass TestApplicationListener extends ApplicationAdapter {}
}
这个Runner配合一个注解NeedGL使用,我在实际使用中,对于需要GL的测试加注解,对于不需要的,比如文件测试,还是使用的JglfwApplication。
来看一个测试
@RunWith(LibgdxRunner.class)
publicclass O2DDialogTest {
private O2DDialog o2DDialog;
@Before
publicvoidsetUp()throws Exception {
VisUI visUI =new VisUI();
visUI.load(Gdx.files.local("assets/style/uiskin.json"));
o2DDialog =new O2DDialog("O2DDialog Test");
}
@Test
@NeedGL
publicvoidshouldAddCloseButton()throws Exception {
o2DDialog.addCloseButton();
Table titleTable = o2DDialog.getTitleTable();
assertThat(titleTable.getCells().size, is(2));
assertThat(titleTable.getCells(), hasItems(
hasProperty("actor", instanceOf(Label.class)),
hasProperty("actor", instanceOf(VisImageButton.class))));
}
}
这个O2DDialog会从visUI的Skin中创建默认样式的文字标签和按钮,而addCloseButton会添加一个关闭按钮,附带一个默认的Label。
如果需要测试界面的响应,原理是一样的,但是绘制的内容需要在线程间共享,我这里用的是一个内置的消息队列来获取,点击和输入都可以直接调用Libgdx的代码来实现。
如果需要在CI服务器(比如travis或者自己的jenkins),那么可能遇到一个问题就是没有GUI界面导致的x connection错误,这个时候使用xvfb即可。
还可以使用xvfb来测试分辨的适配性。
在travis中可以使用配置
before_script:
-"/sbin/start-stop-daemon--start--quiet--pidfile/tmp/custom_xvfb_99.pid--make-pidfile--background--exec/usr/bin/Xvfb--:99-ac-screen01280x1024x16"
本文版权归作者所有,欢迎转载,但未经作者同意必须保留此段声明,且在文章页面明显位置给出原文连接,否则保留追究法律责任的权利。
转载自夜明的孤行灯
本文链接地址: https://www.huangyunkun.com/2015/09/06/libgdx-unit-test-with-runner/