本文版权归作者所有,欢迎转载,但未经作者同意必须保留此段声明,且在文章页面明显位置给出原文连接,否则保留追究法律责任的权利。
转载自夜明的孤行灯
AngularJS的一大特性就是Module的加载和依赖注入,本文将分析一下loader.js和最后这些代码文件是怎么组织和运行的。
Loader.js
该文件中只有setupModuleLoader函数,当然它的返回值是一个函数,包含了angular.Module的API。
首先是位置,这些配置和模块保存在哪里
var $injectorMinErr = minErr('$injector');
var ngMinErr = minErr('ng');
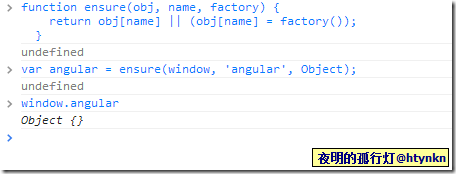
function ensure(obj, name, factory) {
return obj[name] || (obj[name] = factory());
}
var angular = ensure(window,'angular',Object);
前两句建立两个错误提示用的对象,这个在前一篇文章有介绍。
接下来声明的函数用于新建对象,return语句利用惰性求知保证了对象的存在性。如果存在就直接返回,否则利用提供的函数新建。
下一句就声明了angular对象,传入的参数是window,angular字符串和Object。
所有浏览器都支持 window 对象。而全局变量是 window 对象的属性。 全局函数是 window 对象的方法。
这句话将angular绑定在window对象上。当然这是的angular只是一个普通的Object对象。
而最后它将变成
[ ])
])
这些扩充不是在loader.js中完成的,而是在AngularPublic.js中进行的。
再继续看这句
angular.$$minErr = angular.$$minErr || minErr;
刚才说到了minErr是一个很方便的东西,它可以提供更丰富的错误消息处理。而ngResource模块中的第一句就使用了
var $resourceMinErr = angular.$$minErr('$resource');
所以这里将minErr暴露出去。
接下来是
return ensure(angular,'module',function() {
...
});
这里将名为module的对象绑定到angular上,也就是window.angular.module

接下来看看模块的具体处理。首先是判断你的模块名称是否正确。
var assertNotHasOwnProperty =function(name, context) {
if (name ==='hasOwnProperty') {
throw ngMinErr('badname','hasOwnProperty is not a valid {0} name', context);
}
};

assertNotHasOwnProperty(name,'module');
其实就是判断名字是不是module ⊙﹏⊙b汗。
然后是判断是否提供了依赖声明,现有模块中是否已经有了,如果有了重置之。
if (requires && modules.hasOwnProperty(name)) {
modules[name] =null;
}
modules是该方法中的一个变量
var modules = {};
然后是判断是否声明了依赖,如果没有报错。当然如果你的模块不需要依赖其他的,使用[]即可。
if (!requires) {
throw $injectorMinErr('nomod',"Module '{0}' is not available! You either misspelled " +
"the module name or forgot to load it. If registering a module ensure that you " +
"specify the dependencies as the second argument.", name);
}
然后声明了两个数组
var invokeQueue = [];
var runBlocks = [];
第一个是调用队列,在createInjector中会被调用。而第二个是函数数组,其中的函数将在注入器之后被调用,通过run方法注册需要的运行的函数。
而invokeQueue的添加是invokeLater函数
function invokeLater(provider, method, insertMethod) {
returnfunction() {
invokeQueue[insertMethod ||'push']([provider, method,arguments]);
return moduleInstance;
};
}
将传入的参数放入这个数组的头部。可以看出loader只是记录了需要的依赖,需要的调用等等,并没有真正执行,所以取名叫invokeLater而不是invoke了。
AngularPublic.js
刚才已经看到了,通过ensure函数我们暴露了一个angular,但是它只是一个Object,并没有相关的功能,而这些扩展就是AngularPublic做的了。
首先是关于版本的东西
var version = {
full:'"NG_VERSION_FULL"',
major:"NG_VERSION_MAJOR",
minor:"NG_VERSION_MINOR",
dot:"NG_VERSION_DOT",
codeName:'"NG_VERSION_CODENAME"'
};
其中的字符串由Grunt负责替换,而具体内容是解读package.json所得。
然后是publishExternalAPI函数了。
先将一些基本的方法和函数暴露出去
extend(angular, {
'bootstrap': bootstrap,
'copy': copy,
'extend': extend,
'equals': equals,
'element': jqLite,
'forEach': forEach,
'injector': createInjector,
'noop':noop,
'bind':bind,
'toJson': toJson,
'fromJson': fromJson,
'identity':identity,
'isUndefined': isUndefined,
'isDefined': isDefined,
'isString': isString,
'isFunction': isFunction,
'isObject': isObject,
'isNumber': isNumber,
'isElement': isElement,
'isArray': isArray,
'version': version,
'isDate': isDate,
'lowercase': lowercase,
'uppercase': uppercase,
'callbacks': {counter:0},
'$$minErr': minErr,
'$$csp': csp
});
这也是我们看到的window.angular的内容。
然后是获得模块加载器,就是文章前部分分析的内容
angularModule = setupModuleLoader(window);
将在ngLocal和ng对象。
try {
angularModule('ngLocale');
}catch (e) {
angularModule('ngLocale', []).provider('$locale', $LocaleProvider);
}
angularModule('ng', ['ngLocale'], ['$provide',
function ngModule($provide) {
...
}
]);
注意一下SanitizeUriProvider,它在ng中,是一个内部服务,主要处理链接,“编译”的时候会用到它,所以先初始化它。
$provide.provider({
$$sanitizeUri: $$SanitizeUriProvider
});
然后是就是常用的指令、处理器等等
$provide.provider('$compile', $CompileProvider).
directive({
a: htmlAnchorDirective,
input: inputDirective,
textarea: inputDirective,
form: formDirective
...
});
$provide.provider({
$anchorScroll: $AnchorScrollProvider,
$animate: $AnimateProvider,
$browser: $BrowserProvider
...
});
我最开始以为这就结束了…然后才发现这还是一个函数呀…谁调用了它…结果在angular.suffix中
bindJQuery();
publishExternalAPI(angular);
jqLite(document).ready(function() {
angularInit(document, bootstrap);
});
})(window,document);
这段代码没有闭合,因为还有一个angular.prefix文件
(function(window, document, undefined) {
那么这两个文件的内容是怎么合并到最终的js文件中的呢?
是Grunt干的!
想想我们的grunt package命令,然后看看lib/grunt/utils.js文件。
wrap:function(src, name){
src.unshift('src/' + name +'.prefix');
src.push('src/' + name +'.suffix');
return src;
}
就是它将.prefix文件盒.suffix文件添加到合并后的js文件中去的。
在Gruntfile.js配置如下:
src: util.wrap([files['angularSrc']],'angular')
这样,在package的时候运行到build任务下的angular时,这两个文件就会合并到源文件之中了。
结语
这些是src根目录下的文件,而src下的目录中的文件就是各个方面的东西了,比如ng,ngAnimate,ngCookies等等。
几个参考:
本文版权归作者所有,欢迎转载,但未经作者同意必须保留此段声明,且在文章页面明显位置给出原文连接,否则保留追究法律责任的权利。
转载自夜明的孤行灯